Hand plane skew angles

7 06 2010

Usually hand planes are pushed straight ahead, but sometimes it’s useful to turn them a little bit relative to the direction of motion.

When you push a hand plane straight forward, the cutting edge is a line that is perpendicular to the direction of motion. We can call this “normal” planing (pardon the pun). When you rotate the plane a bit and still push it in the same direction, the cutting edge is now at an oblique angle to the direction of motion. This is planing at a skew.

Left: normal plane motion. Right: skewed plane motion. The red line represents the edge of the blade.

One thing that skewing does is reduce the effective angle. This is the angle between the planed surface along the axis of motion, and the upper side of the cutting edge. A lower effective angle should reduce resistance when making a cut. Here’s what it looks like when you plane at a skew. (In practice, there’s usually not a big arrow in front of the blade, nor is there tiny writing all over the place.)

The relationship between the pitch, skew, and effective angles. The pitch angle is the angle between the upper side of the bevel and the surface being planed. The angle of the lower bevel doesn't matter here, so for simplicity, it's shown as flat on the surface being planed.

How do you calculate the effective angle from the blade angle and skew angle? It might help to have some definitions here.

Read the rest of this entry »


A homemade straightedge

16 05 2010

If you go to the office store or hardware store and buy a ruler, you might think that you’ve gotten two for the price of one: a length-measuring tool, and a straightedge. Unfortunately, this isn’t always the case. A regular old ruler may or may not be straight. Try this: put the ruler it down on a sheet of paper, mark a line along the edge with a 0.5 mm mechanical pencil, then flip it over and mark another line on top of the previous one. If the lines are directly on top of each other, the edge is straight — at least, it’s straight enough that the error can’t be seen with half-millimeter pencil line. I have at least one ruler where the gap between the lines is over 1 mm.

Nothing is perfectly straight. The only question is how far from straight your straightedge is. For most drawing and measuring applications, if it passes the test above, it’s good enough. But sometimes you need it to be better. In woodworking, the surfaces of some tools need to be very flat — much flatter than 0.5 mm. A hand plane with a sole that’s flat to only 0.5 mm would be worse than useless; it would unpredictable and inconsistent, and would gouge the workpiece horribly. (Unfortunately, inexpensive metal hand planes are all like this out of the box — maybe not as bad as 0.5mm, but bad enough that they really can only be used to damage wood. Seriously. This is not an exaggeration.) I don’t know exactly how flat the sole of a hand plane needs to be, but it certainly needs to be better than 0.5 mm, or even 0.1 mm.

I was considering buying a good straightedge, but before I actually did it, I saw in Toshio Odate’s book Japanese Woodworking Tools a method for makingĀ  a straightedge. The purpose of the straightedge in his book is specifically for checking the sole of a plane, but it could be used for any purpose.

To make it: the short version of the story is that you take two pieces of wood, put next to each other and plane them, then “unfold” the two objects so that the planed edges are facing each other, then check for light between them. If there’s light, you shave away the high spots and check again. The are two reasons why you make a pair of objects: first, you don’t need a good reference straightedge to check to see if your new straightedge is actually straight, and second, any deviation will be doubled, making it possible to see errors that are half the size of what you would be able to see even if you had a perfect straightedge to compare it to. This paired-planing method is, in theory, twice as accurate as making a single object and comparing to perfect straightedge.

Planing the two parts of the straightedge. There are two thin pieces of wood, clamped together so they don't fall over.

Checking for straightness. The pieces are "unfolded" so that the planed sides are facing each other. In this photo, the ends here are bowed apart, indicating that I put too much pressure at the end of the planing stroke. I eventually got it much better, but not perfect.

Read the rest of this entry »


Sharpening chisels consistently, part 2

2 04 2010

After my previous post about sharpening chisels, I received a helpful comment which informed me that another way to set angles consistently for sharpening chisels is to make a blade projection board. This takes just a little bit of work and has many advantages over the marking method I wrote about before.

The angle of the blade in the honing guide is determined by how far it projects from the front, and so the key to getting the same angle every time is to make sure that the blade projection length is the same every time. Having a physical guide is faster and more precise than visually lining up a mark.

Making the jig is simple. First, decide which angles you want to use for the primary and secondary bevel. Next, put the blade in the honing guide and adjust the blade projection until you get the desired angles. For each angle, measure how far the blade sticks out. Then take a board and attach stops that are those distances from the edge.

To gauge blade angles, I used an application for my iPod Touch called Clinometer. Even though it’s not particularly important to set it at a specific angle (27 vs. 28 degrees, for example), it’s still nice to know what the angle is.

Measuring the angle of the chisel in the guide, on a glass plate (the other side happens to have sandpaper glued to it).

I made the jig with stops for 25 degrees for the primary bevel, and 28 degrees for the secondary bevel. The stops were placed at 41 and 34 millimeters.

Read the rest of this entry »


Calibrating a dial thermometer

26 02 2010

How accurate is your kitchen thermometer? And if it’s accurate at one temperature, does that mean that it’s accurate over its entire range?

What brings me to this question is, of course, coffee. I’ve found that some kinds of coffee are very sensitive to the brewing temperature. Just a couple degrees in either direction can make a good coffee bitter or sour, and if the temperature is just right, it can bring out undertones of cocoa, delicate berry notes, and perhaps even a lush, winelike acidity. OK, I admit that I just copied that last bit from fancy coffee websites. My coffee palate may not be particularly refined, but I do know from experience that sourness and bitterness depend on temperature.

The adjustment nut

The kind of thermometer most commonly found in the kitchen is a dial thermometer, also called an instant-read thermometer. (But what thermometers aren’t read in an instant?) They are typically calibrated in one of two ways. The first way is to put it in boiling water, check the reading, and if it’s not at 212 degrees (or 100, if you live in one of those other countries), use a wrench to turn the adjustment nut on the underside of the dial until it is. A couple of things to be careful of when doing this: First, it’s hot! Second, unless you live at sea level, the boiling temperature of water isn’t exactly 212 degrees. I live in Chicago, which is at about 600 feet, and the boiling temperature here is just a tiny bit lower, at 211 degrees. (The boiling point of water decreases by about 1 degree F for every 500 feet of elevation.)

The second way to calibrate a thermometer is to put it in ice water, and adjust the nut so that it reads 32 degrees. When it comes out of the freezer or in from the outdoors, ice is usually colder than 32 degrees, and water from the tap is generally much warmer. When you put the two together, it takes some time for the ice to warm up to 32 degrees and for water to cool to 32 degrees, so before adjusting the thermometer, you should wait a while for the water and ice to stabilize at the freezing point.

This brings us to the next question: If you calibrate your thermometer at the freezing or boiling point, does that mean that it will be accurate over its entire range?

Read the rest of this entry »


The density of ground vs. unground coffee

23 02 2010

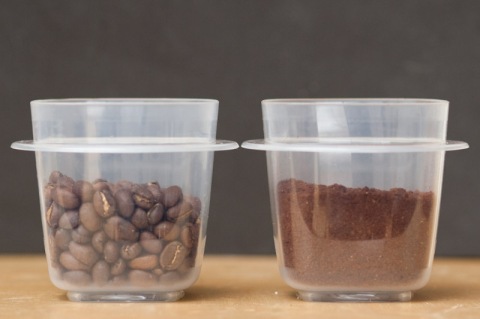
Does ground coffee take up more, less, or the same volume as whole bean coffee? If I want two scoops of ground coffee, how many scoops of whole beans should I put in the grinder?

To find out, I put two scoops* of coffee beans in my blade grinder and ground it fine. After putting it into a plastic container, I gently shook it to get the coffee to settle, as it would in a package of ground coffee.

The result: pretty darn close to the same volume.

Two scoops (16 grams) of coffee, whole and ground

* The scoop I used is from an Aeropress, and is somewhat larger than a typical coffee scoop. According to a scale, two scoops of coffee is just under 16 grams.


Visualizing my net worth

19 02 2010

Today I decided to see my how my net worth would look next to Bill Gates’s net worth. According to Wikipedia, he has about 50 billion dollars, and made a rough guess that I had about 25 thousand (including savings and assets). According to these numbers, he has two million times as much money as I do.

In terms of distance, if his money was 100 meters, then mine would be 1/20th of a millimeter, or 50 microns. I measured a hair from the top of my head at 65 microns. Imagine that Bill Gates’s earthly possessions are the length of a soccer field, and then put a hair across that length. The width of that hair would represent more than everything I own.

This micrometer measures in inches (.05mm is just under .002"), and can open to a maximum of 1". The barely-visible gap represents my life savings.

This hair measures about .0025", which is about .065 mm (65 microns).